Framing Your Hunting Trophy - Hunting Photography Series - Part 6
Part 6 - How to Frame Your Hunting Trophy - Hunting Photography Series
Framing Your Trophy
You worked your ass off training and getting in some range time during the preseason. You weeded your way the application systems and pulled a tag. You begged time off from a boss that doesn’t understand why anyone would take “vacation time” to sit in the dirty woods with man eating animals. You’ve spent countless hours away from your family, sleeping in the dirt and chasing animals that did everything they could to elude you. At long last you finally arrowed one, tracked him down and took a knee and gave a fist bump to the heavens above.
Now it’s time to get the cover photo for Eastmans Magazine. Snap a pic with your iPhone and be done with it, right? If you’re looking to impress grandma maybe, but if you’re looking to have the photo seen you’re going to want to take your time and do this right.
When telling the story of a hunt we want closure. Either failure or success. Often it’s the former, but with success comes the grip and grin. Don’t let others shame you into not taking that photo. Hold that trophy in your hands and be proud of it.
Using Your Background to Your Advantage
The background of this all important photo is almost as important as the trophy you hold in your hands. It tells a large part of the story. Was the animal taken in the mountains or on the plains? Simply having your hunting partner snap a pic of you while he’s standing there won’t tell either story. Great pictures don’t simply happen, they’re planned out.
So how can you include more story in the shot?

Break the horizon line with you and your trophy.
Get that camera closer to the ground so you and the animal break the horizon line.
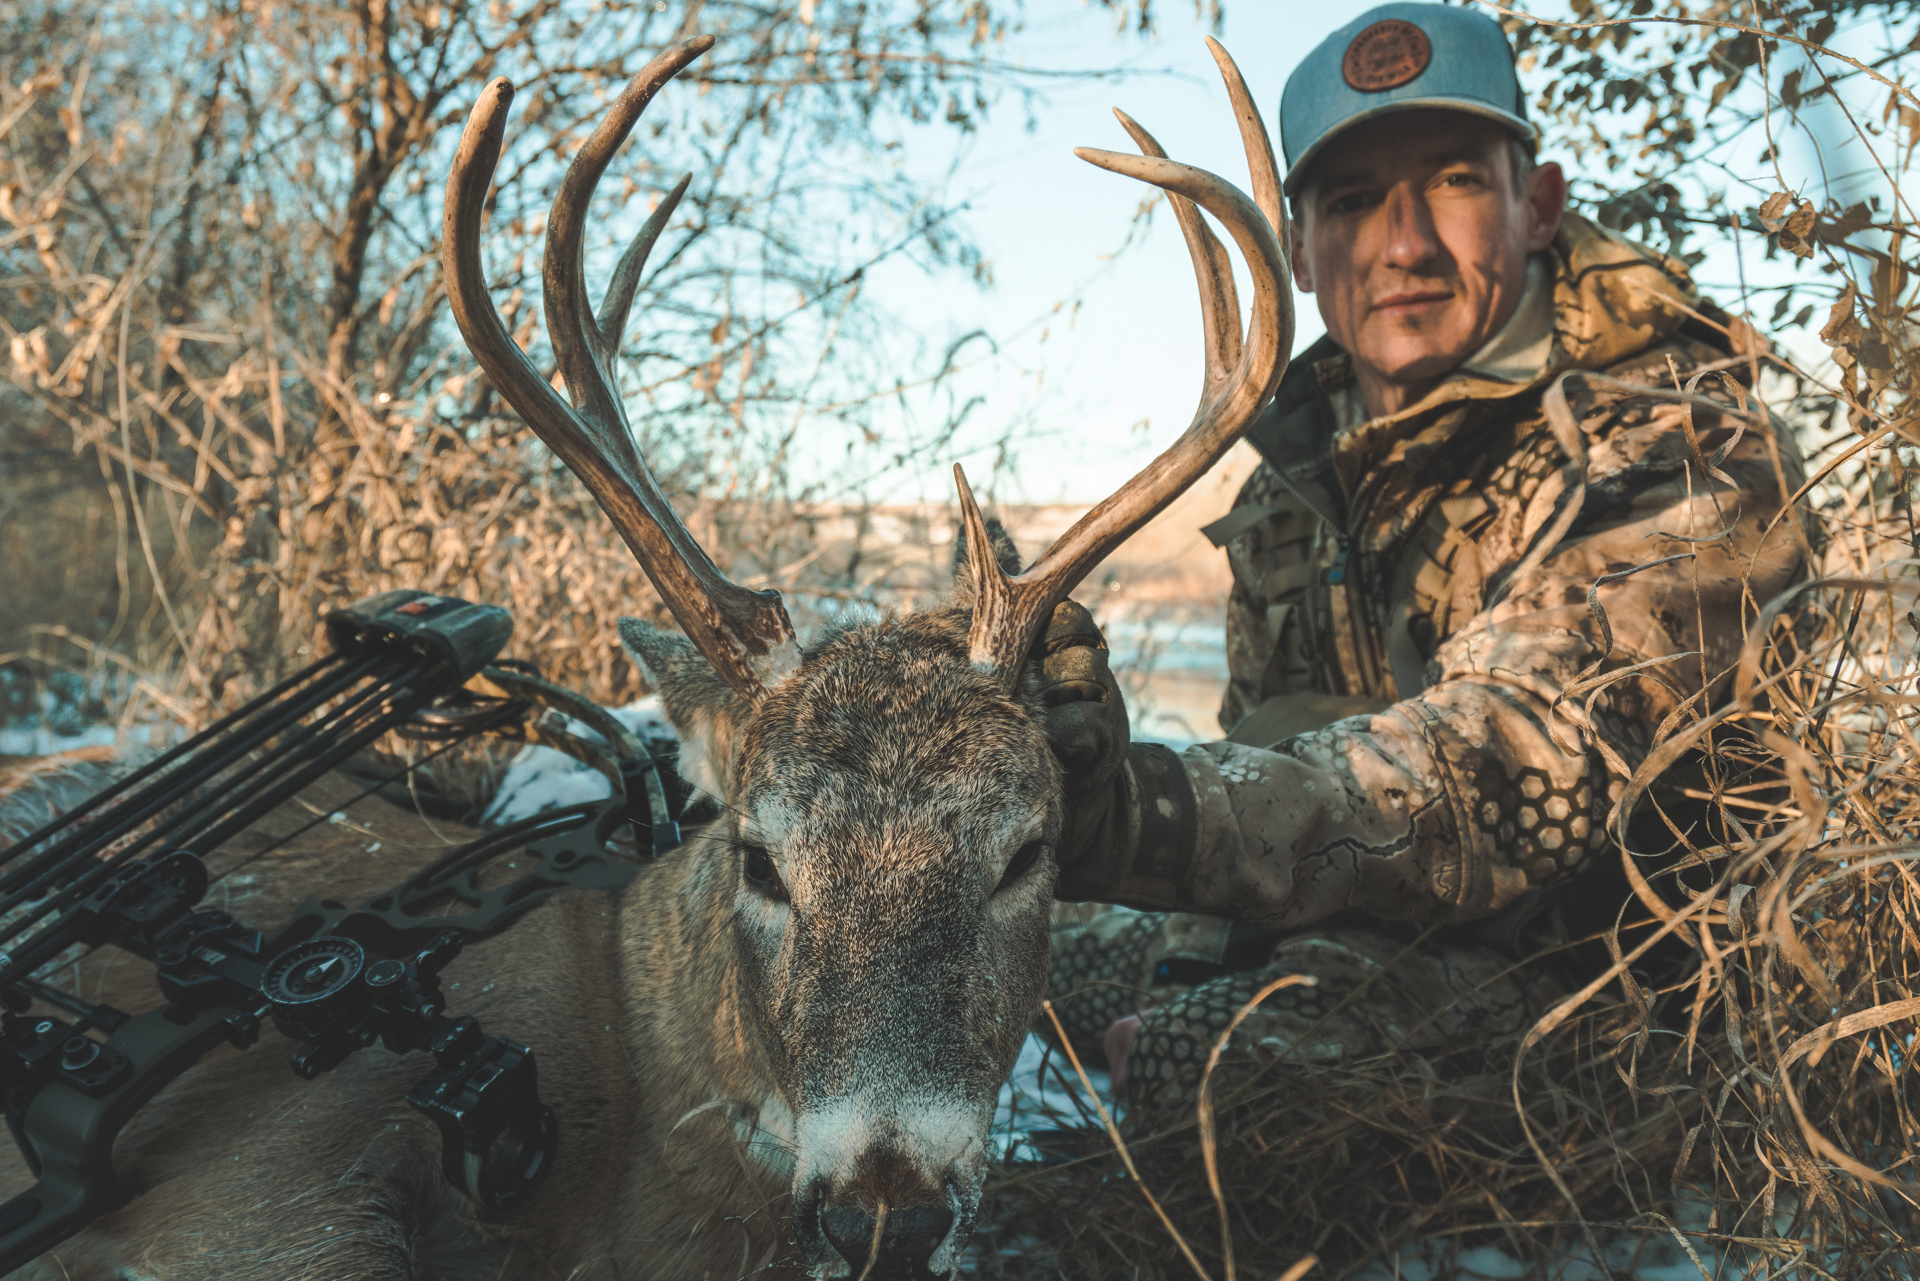
You’ll want to place the camera on a tripod or have your hunting partner get the camera close to the ground. You’re looking to have the animal’s horns/antlers as well as your head break the horizon line. By doing this you’re reducing the clutter in the background. It will force the viewer’s eyes where you want them, on you and your trophy. The rest of the background elements are important to help tell the story, but keep you and your trophy as the primary focus.

The cool butte in the background is iconic for the area.
Position the animal and camera angle to integrate key elements of the background.
Is there a cool mountain peak full of snow in the background? How about a windmill off in the distance standing erect in an otherwise desolate plain?
These are element that belong in the story. They help the viewer picture where the hunt has taken place. These are elements that are going to strengthen you picture.
Pro Tip: Make sure those elements aren’t directly behind you or your trophy. Set them off to the side a bit. You don’t want it to look like that windmill or mountain peak is growing out of your head.
There wasn’t much I could do with the background and positioning on this one so I cranked down the depth of field as much as possible.
What happens if your simply not in a cool looking location? This is where a shallow depth of field helps. Keep you and your trophy in focus and let the background blur out creating a cool texture.
How to Pose and Clean Up the Animal
This is often debated within the hunting community and honestly, I can care less. We live in a time where most people feel the need to tell others how to live their lives. I refuse to participate in these ridiculous debates.
So if you want to clean up the animal so theirs not blood drooling out of their mouths? Do it. Position it so that the it emphasizes the animals headgear? Have at it.
Often you’ll want to tuck the animal’s legs underneath it and position it in a laying down position. Grab the antler with one hand and twist his head so he is looking perpendicular to the length of his body. Make sure that there isn’t any tree branches or distracting features behind his rack. Reposition the camera or the animal to fix that if necessary.

You’ll want to position yourself off to the side so you’re lined up over the animal’s body. Again you want your head as well as the animals above the horizon line if possible.
I often clean up the wound a bit with anything lying around. Grass typically does the trick. I’ll also push the animals tongue back in it’s mouth. You can carry a twisty tie (like what they use to close a bread bag) to wire the animal’s mouth shut if necessary.
What Lense Should You Use?
Here starts another debate and can get you laughed at a good bit if you overdo it. We’ve all seen those pics where guys are standing a ways behind their trophy and shooting with a wide angle lens. The animal ends up looking like a prehistoric beast that will break all the record books. It’s bordering on an outright lie.

It can feel like this sometimes with the pictures I see out there.
But there is something to be said for highlighting the animal’s strong points. So tread lightly here.
Get your camera close to you and your trophy and use a wide angle lens. I wouldn’t go less than 28mm otherwise you will be treading on what we talked about above.
Being an arm’s length behind the animal seems to be acceptable and keeps the shot looking realistic.

I brought a flash with me on this hunt. I used it to help separate me from the background.
Lighting Options
Underated to the uninitiated. Lighting is extremely important. If you have that sun blasting behind you and your trophy with nothing to fill in the dark shadows it creates, the picture could be lost.
So there’s several ways to work around this. I always carry a flash with me, but I understand that is not practical for most people. I love this stuff to no end, so for me I’m willing to add a pound or so to my backcountry pack.
An alternative is to use what’s handy. I’ve had the sun to my back before and had a hunting partner hold up a white game bag in front of me to use as a reflector. It’s a great way to fill in deep shadows.
Another simpler way would be to just position you and your trophy to face the sun. Keep hat bills back so there isn’t a drastic shadow across your face if possible.
If it’s a semi-cloudy day it is often to your advantage to wait until a cloud goes over the sun. This will diffuse the light and give less dramatic shadows.

Here’s a different way to display your trophy besides having them on the ground.
Conclusion
I always like to end these photo series posts with this caveat. These are just ideas for you. A simple formula, but please by all means make up your own. That’s what will make your images unique and different from the crowd. These are ideas to keep in the back of your head and to be used to help spark ideas of your own.
Tag me on Instagram @fredbohm. I’d love to see how you put some of these ideas into action.
// Fred Bohm