Capturing Action - Shutter Speed and Motion Blur - Hunting Photography Series - Part 5
Part 5 - Capturing Action - Shutter Speed When and Why - Hunting Photography Series
Capturing action in a photo? Doesn’t sound like something that photographers worry about, it sounds more like it should be in the realm of film. If you believe this to be true you are missing out in a very important element that can take your photos to the next level.
Some may think we are at a severe disadvantage when it comes to telling a story with photography compared to guys who shoot video. We don’t have thousands of frames running together to show what is going on in the scene, we lack audio to inform the viewer of what is going on and no music to set the mood. Disadvantage perhaps, impossible to do with photography? Certainly not. Capturing action within the photo is an art form and can be a powerful way to tell your story through a still image.
You should always be thinking how you can add action to your shots. It’s not always appropriate, but at least having it in the back of your mind will help you determine if it should be used or not.
There are a couple of different ways to catch action in your still photos that we’ll go through in this article.
Implied Action - Capturing movement that the viewer understands is occuring due to the nature of the shot.
Motion Blur - The streaking of objects implying their movement within the image.
Both of these tools are simple to use, but can have a powerful effect on your imagery. Capturing action helps tell story better and with a lot more excitement. Plus its under utilized by many photographers so it will help your imagery stand out.
Look back to some of the photos you have previously taken and ask yourself if action could have enhanced the image. More than likely in just about all of them the answer would be yes. It doesn’t always have to be the subject performing the action as well. Moving background elements can be just as beneficial.
A technical heads up. You will need a tripod to be able to shoot with slower shutter speeds. You are trying to capture motion within the scene, not the shake of your hands. A general rule of thumb is to use a tripod for shutter speeds slower than 1/60 seconds.
Let’s break down the two ways I described above on how to capture action so you can get started on using this tool in your own photos.
Implied Action
Implied action is pretty simple. Often times it’s more about being aware of it than actually creating it. It’s as simple as having something in your image that the viewer assumes is moving.
Perhaps it’s a train locomotive moving towards the camera with smoke billowing out of its stack and covering the train cars behind. The viewer’s brain will automatically assume the locomotive is moving. Why? The smoke pouring out and covering the cars behind is likely occurring because of the train’s forward movement. Add a subject in front (and off to the side, let’s not get anyone killed here) and you have yourself one powerful image.
What can we do with our subject that will suggest action? Instead of just standing there how about making them do something? Look for simple actions they could take that would help create a story in your image.
Jumping can be a great way to add action to a shot. There is no other way that the subject could be in that position other than jumping. Implied action at its best.
Here’s a shot I took of myself jumping a gap in the rocks. There is no other way I could be in that position other than jumping. An instant injection of action.

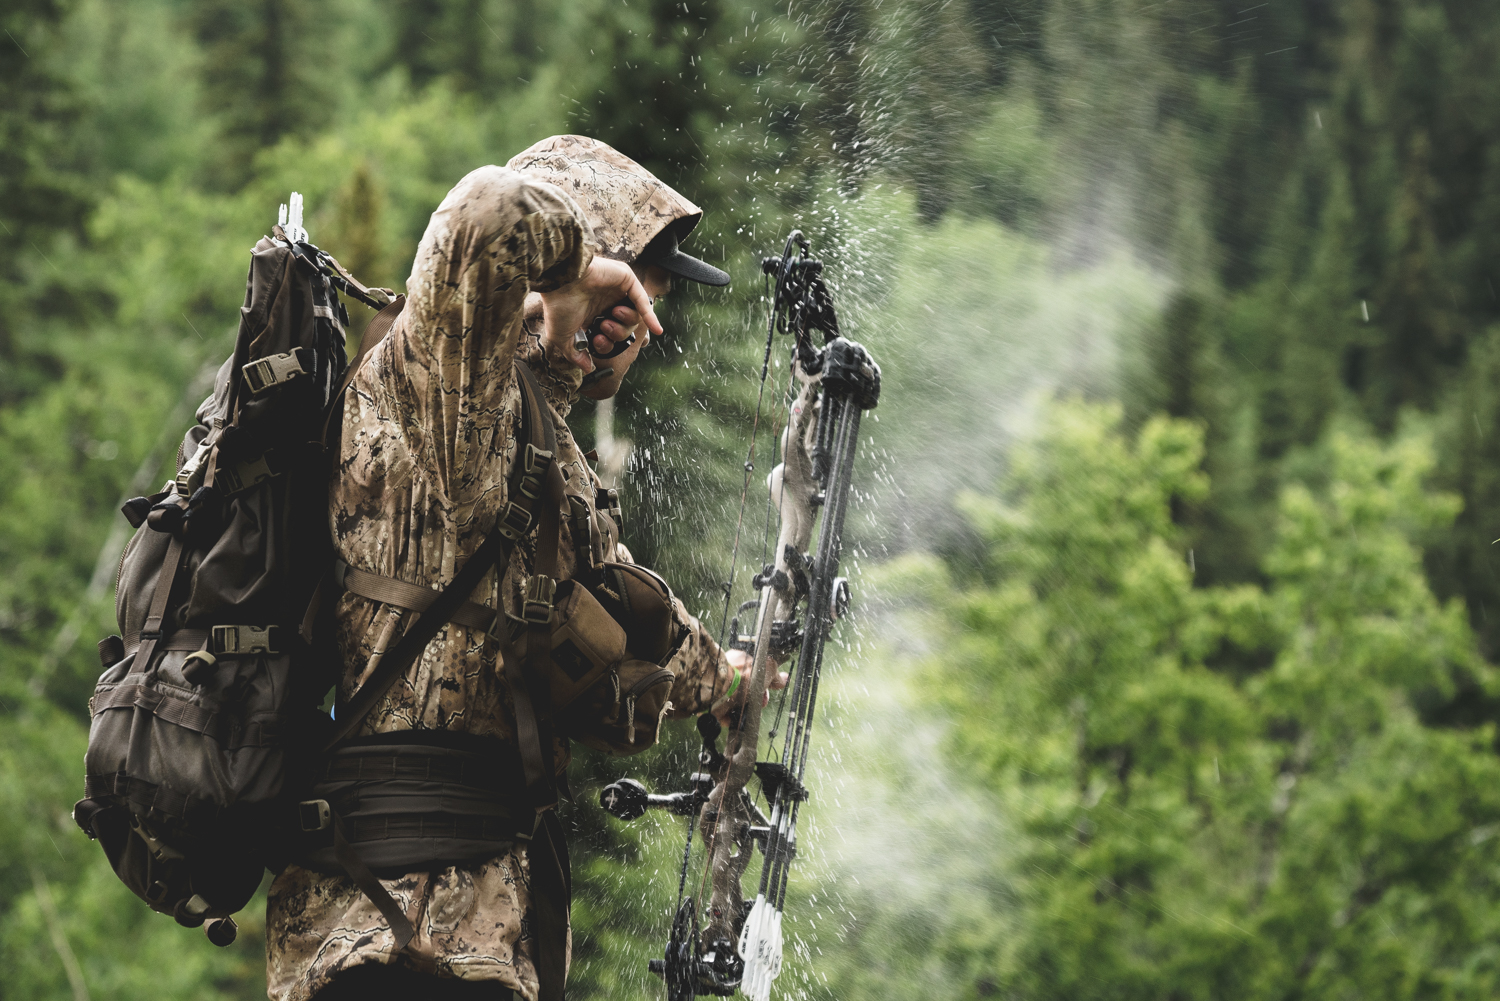
Or how about water flying off of your bow after a rainstorm? A pretty cool way to enhance a shot.
If you’re trying to show off a piece of gear lets say, a great way of doing it would be tossing it in the air and freezing it there. A levitation effect so to speak.

This is a great spot to jump into our next section as capturing the techniques above will take some forethought when it comes to the shutter speed you choose.
Motion Blur
To motion blur or not motion blur, that is the question. But perhaps I’m putting the cart before the horse. Let’s go over what motion blur is and how we can capture it for those of us that haven’t heard of it.
Motion blur is the apparent movement of an object in a scene that shows itself in streaks. What is happening here is that the shutter of your camera is open long enough that the moving object isn’t completely still in the photo, rather you see where the object starts and stops during the time the shutter is open. Basically a very fast shutter will make the image appear still and therefor crisp in the scene. A slower shutter will show motion blur that represents movement.
Both can capture action, but you’ll have to determine which will look better and tell the story better in each particular instance.
What determines a “slow” shutter speed is how fast the object itself is moving. You might have to speed up the shutter to say 1/5000 to capture a hummingbird without motion blur, but a human walking might only require 1/100 of a shutter speed. You will need to determine what is the appropriate shutter speed to get look you want. Luckily in this age of digital cameras you get instant feedback and can make appropriate adjustments almost instantly.
Let’s take a look at some photos and determine how they were created using motion blur to our advantage.
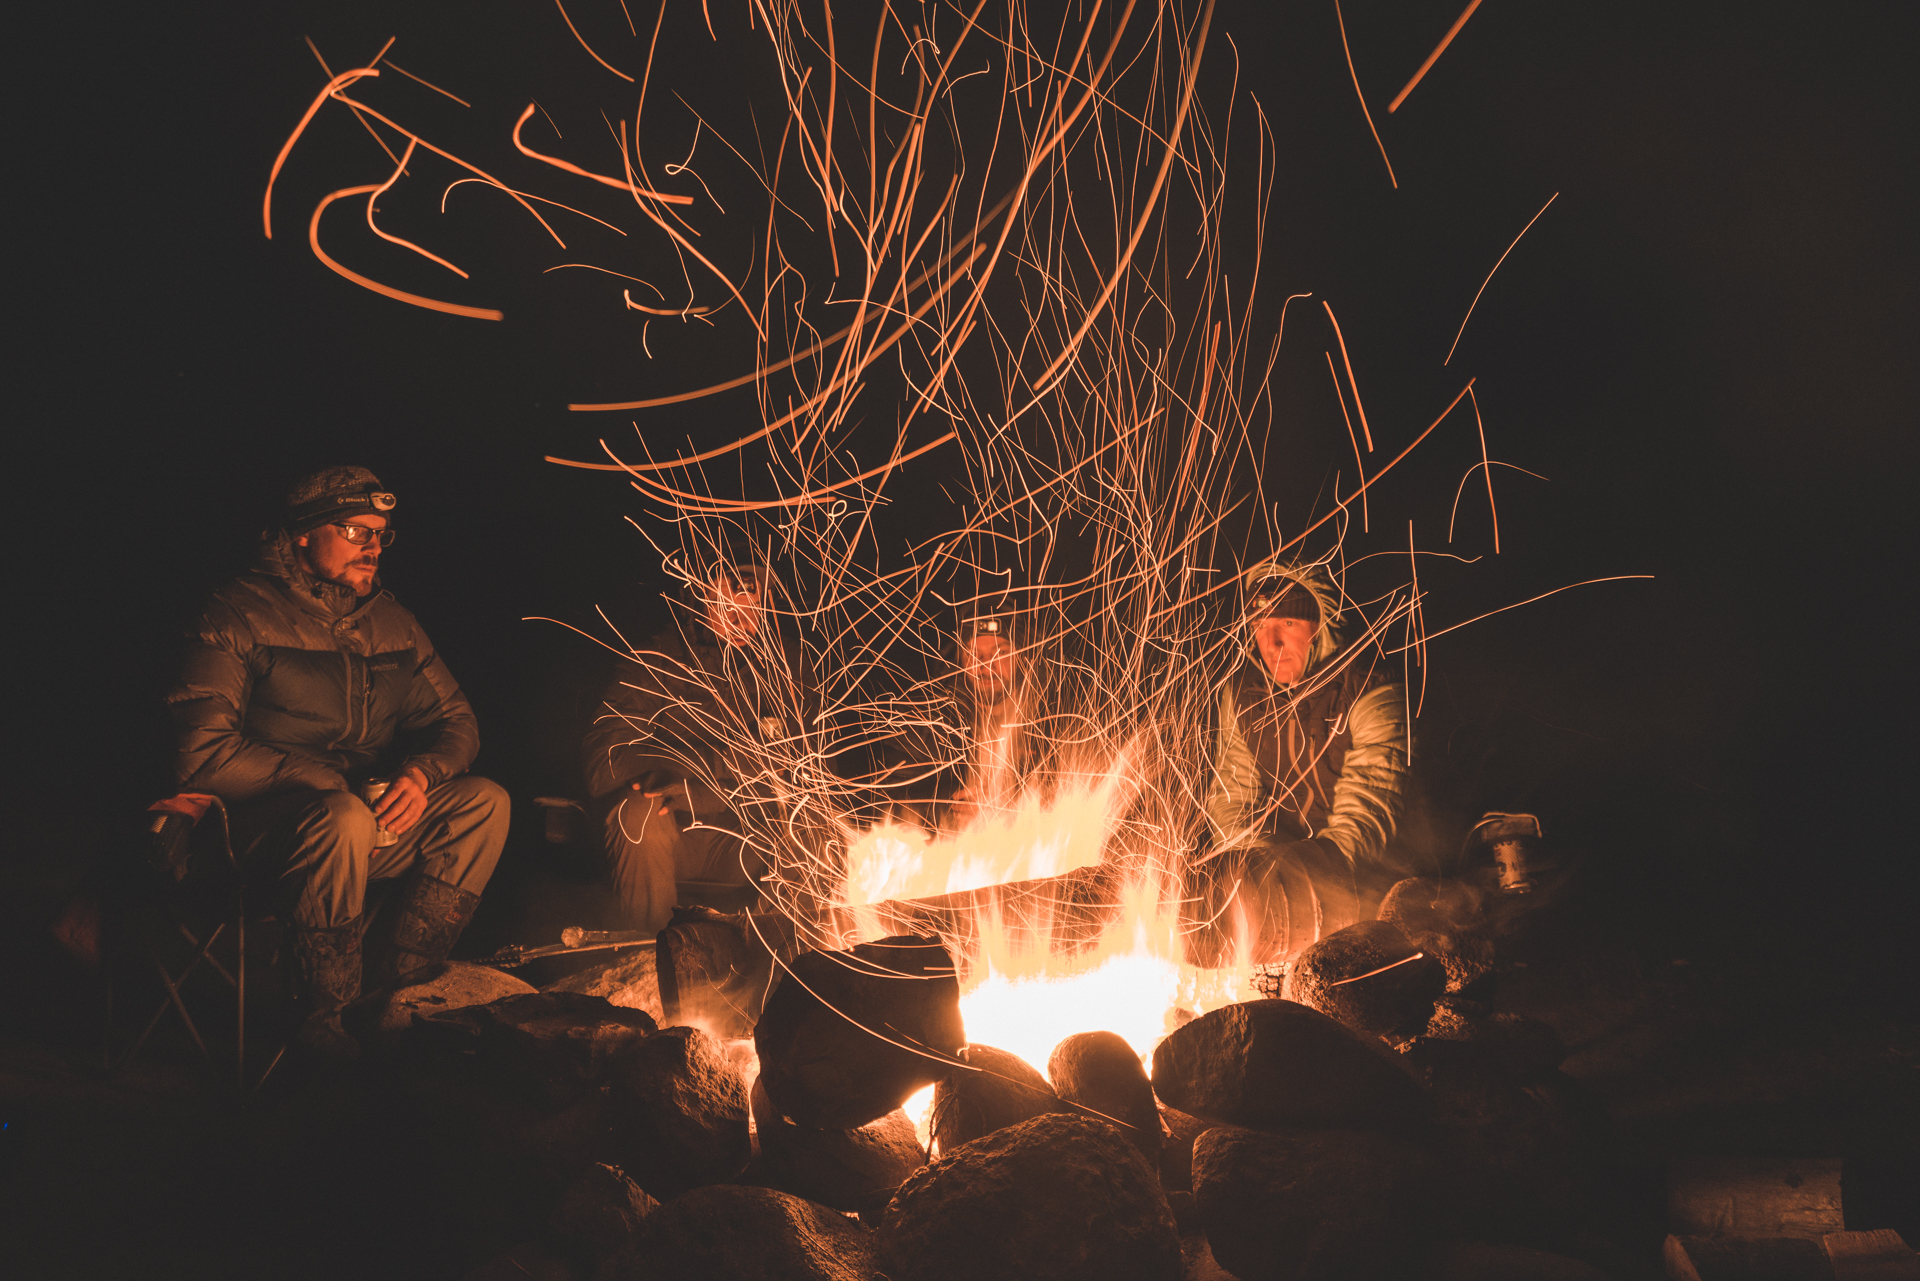
Here is a picture of me and some buddies sitting around a campfire. I set the shutter speed to ⅕ of a second in order to capture the trail of the campfire sparks. At that shutter speed we get beautiful streaks that both make the image interesting as well as imply action. Warning: at that slow of a shutter speed it is easy to pick up motion blur on your human subjects. You will need them to hold as still as possible to avoid “ghosting”.

Here’s one of my favorite ways to capture a trophy shot at night. Most of us don’t carry a flash in the backcountry so it can be hard to capture a kill in the dark. Considering most animals are shot early in the morning or late in the evening this can prove to be a photographers nightmare for the later. So we have to improvise.
“Light Painting” is a really cool way to light the scene as well as create a really cool light streak from the motion blur of your light source. In this instance it’s my headlamp.
For this shot I used a shutter speed of 10 seconds. That’s really slow so any movement in the scene will create motion blur. Your subject is going to have to stay as still as possible so that they don’t look blurry.
What I did here was open the shutter and then shine the light all over the front of the hunter and elk. Then I slowly walked around the subject painting the back of them and making sure the camera lense received a healthy dose of headlamp as well. I also used a second headlamp to backlight the subject to create a rimming effect behind the hunter and elk. I didn’t worry about me showing up in the image although I walked completely through it. My movement was fast enough that I didn’t show up in the image.

Another example of how we can use as slow shutter speed and motion blur to make a more interesting picture. Here the archer is shooting with a lighted nock. I set the shutter to 0.4 seconds. As you could imagine this is a tough window to hit for the arrow flight so there was a lot of 1,2,3 shoot! In there to get it right. But hey, pixels are cheap so let them fly.
Whip Zoom

This is a fun way to add motion blur and force the eye of the viewer. What you’re looking to do here is use a slower shutter speed, let’s say around 1/30th of a second, and zoom in real quick with your lens. This will give you the above effect. Adds more motion to a picture instantly.
Another variation of this is to use a slower shutter speed again and move the camera quickly to follow the subject. The subject will be relatively unblurred while the background has considerable motion blur.
Putting It Into Practice
And there you go. It’s as simple as that. Slow down your shutter speed, use a tripod and start making your picture more interesting. Start looking for action in every picture you take. You will start looking at how you use your camera and what’s going on around you in a completely different way. Is it raining? That’s action. Are the clouds moving fast in the sky? That’s action. Is your subject moving over an obstacle? That’s action. Now use it to your advantage and start making some really cool images!
Find me in Instagram at fredbohm and start tagging me in your shots. I’d love to see what you’re up to and how you are using action in your shots.
Now stop listening to me and get out there and shoot!
Continue on to Part 6 - Framing Your Hunting Trophy
// Fred Bohm