
A Hunter's Guide to Dusky Grouse
There isn’t an animal out there that is more exciting, explosive, frustrating and satisfying to hunt than the Dusky grouse. Well, at least in my mind there isn’t. Years have gone into research and scouting in order for me to just flush my first bird, let alone to recover from the ensuing heart attack caused by it’s thunderous take-off to get a hurried shot off. You may think I’m a slow learner and I would have to agree with you, but sometimes the things hardest learned are the things we learn best. Easy money is easily lost, right? Same goes for the hard knocks of the outdoors and grouse hunting. So here is a guide to what I have learned chasing these mountain chickens every fall for the last few blessed years. You may disagree with every tactic written below, hell I would expect at least some of it to raise some eyebrows. Keep an open mind and use what you can to help you out. If nothing else, look at the pretty pictures, smile and think to yourself, “At least this guys isn’t going to wipe out the population for the rest of us.” Enjoy.
Escape - Know What They Are Thinking And Use It Against Them
This quite simply can be the single most important factor once you have a general idea of where they’re at. We’ll get to food and elevation shortly, the two other important factors in finding them. I’ve walked through perfect habits, I mean the correct elevation and a buffet fit for a grouse king and not seen a single bird. What I started to notice is that there are plenty of areas at the right altitude and food, but the ones that hold the birds alway have a quick escape route close by. And what constitutes an escape route for these bombers consists of is quick elevation change. They love it steep, pure and simple. They are used to being chased by coyotes more than humans, so the trees is a logical spot to avoid them. If they can flap their wings five times and make it to safety, they’ll call it good enough and do just that. So the steeper the ground, the quicker they can get to the tree tops (think back to those trigonometry days… you there yet? Wow, you were quicker than I was, good job!)
A nearby cliff works just as well. I find they are more likely to be in flatter grounds if there is a cliff within a couple hundred yards. Same laws apply as above.
So how do we take advantage of this information? One way is to get in-between them and their escape route. Walking uphill and flushing them can throw them for a loop and make them a good bit easier to shoot at. Coming at them from this angle usually forces them to fly straight up to clear you (or your four-legged friend) before they maneuver themselves downhill and nine times out of ten, they will fly downhill. This helps us look like rockstars behind the scatterguns and keeps the pooches happy when your not shooting inches over their head. This works as well with cliffs by having your dog or hunting buddy kick them out and you cut them off. Important Note*: Careful hunting your dog around drop-offs for obvious reasons, they don’t always think before they go chasing after the retrieve. (Yea, yea, get your dog steady to wing and shot and this isn’t a problem. My pup’s current Union contract clearly states that these rules don’t apply to him.)

Classic dusky grouse terrain.
Elevation Usually Equals Food
Reverse migrators, a quirky habit of these guys. When you start your season you’ll be chasing them in the lower elevation sage brush/aspen edges. Just as the snow starts coming in they pack their bags and head up higher to the conifers. Now, I never claimed they're logical creatures. But I guess in a certain way it makes sense. They are following the food. It goes something like this. Bugs, berries, leaves then needles. Now this isn’t an exact science. I’ve seen bugs, leaves and berries in the gullets all at the same time. So this is useless information right? Not really. Here is a breakdown on where and when I hunt them. Please note this can vary according to where you live. I’m in Colorado and hunt the Western Slope. This is also assuming it is a “normal” weather year (I know, there is no such thing in Colorado, let’s make pretend). It could be totally different in Idaho. So I won’t give you exact elevations, but I think you can put a good guess on what it will be like in your area according to this:
1st - 3rd Week of September: I hunt sage fields that have have aspen patches nearby. Again, some type of angle to the land is crucial. Escape always applies. If you see grasshopper jumping about, you’re in a prime food location and they should be around. Berry patches (currants) are a slam dunk as well. Look for small trickling streams. This is super important this time of year as it can get damn hot out and they like to cool their throats down. If the heat is cranked up, I also look for nearby, small patches of conifers where they tend to hide in the shade, attempting to cool off.
4th Week of September - 2nd Week of October: I’m getting into the denser/taller aspens by now. I never really find them in the sapling aspens like I hear that Ruffed grouse love so much, but rather the bigger trees where they can get a purchase on a solid branch after they flush. The trickling stream isn’t quite as important as they’re feeding on leaves that probably give them enough water at this point. If there are any berries left, hunt around them.
3rd Week of October - Mid November: All the good tasting stuff is gone so we’re in the pines. This is their primary food source for the winter. Again a good angle seems to be the preference. If there are aspens mixed in they will tend to fly towards the pines for cover. If there are no leaves on the aspens they don’t usually fly to them because they will stick out like a sore thumb while sitting on the bare branches. If there is snow on the ground you can sometimes find their tracks. If you do, get ready, as they are nearby. Unless the tracks are completely iced over (therefore being old) I almost always find them nearby. This may be a little counter intuitive if your a pheasant hunter, because when I’m out in the plains that’s all I see; tracks but no birds. Grouse don’t run like pheasant do so you’ll often find them close to their tracks.
*** A little tip for you: When you find them, stay within that relative elevation. Once I find them, I’ll mark it on my GPS for future studying and then just follow that contour. It works pretty well.

Dusky grouse tracks.
Weather and Time of Day
These two factors draw many similarities. If it’s stormy and the weather is just breaking, they tend to act as they do in the morning. Under these conditions they tend to clump up in their coveys. This is when you have the best chance at a covey flush. As the day progresses and they feed uphill, they scatter and you’ll get into them one at a time. Again, I’m generalizing here.
In the evening they will fly downhill to roost in the trees for the night. Many an evening while getting camp set, I was dive-bombed by a squadron of grouse making their way to their sleeping quarters.
Online Scouting
All of the above information is well and great, but if you’re not in the same zip code as these guys, no amounts of pounding the terrain is going to help you. You need to find good habitat and then apply the above information. In steps technology. Some complain about it (it’’s not like the old days!) but I love it. There’s no denying it’s benefits and it’s here to stay, so jump aboard gramps or get left in the digital dust.
Those satellites whipping around above that we all think are spying on us (is your life really that interesting?) can prove to be beneficial. We now can see just about every tree in the forest. I’ve even found camp spots ahead of time by seeing other campers parked in the woods. Big brother is watching, so don’t do anything you wouldn’t want to show up on Youtube out there. While we’re on the subject of technology, I figured I’d stay with the times and use it to help show how I use it to find my potential honey holes. Watch the video below for the breakdown of how I find my spots. I’ll use a generic area that everyone knows about so no on gets butt hurt. If you think this is your secret spot and the next time you go there it will be swarmed in a sea of orange, you obviously hunt with your eyes closed. There’s more orange here than in a October pumpkin patch. So here’s the breakdown.
There’s the short of it, in all her glory. Feel free to comment below with your advice to those frustrated beginners out there in need of a little guidance. Grouse hunting is a brotherhood (and sisterhood of course), there’s not many of us that take in the joys of hiking miles of vertical terrain for the potential chance of shooting at one of these glorious birds. Lets hear what your thoughts are on the subject in the comments section.
//Fred

Male and female dusky grouse.

The Best Hunting Shooting Positions
With a antelope hunt coming up in my near future, I’ve been scouring the internet in search of some information on how to improve my shooting positions. The tall grass of the plains can leave us in some awkward positions, somewhere between kneeling and standing. I blew more shots than I care to admit last year and I made a promise to myself and my ego to remedy that this upcoming season. I found a terrific article on http://thebiggamehuntingblog.com that quickly summed up what I needed to know. I contacted the author, John McAdams, and he was more than gracious to share his article with us. John has some solid information that we could all learn from so feel free to jump over to his site at http://thebiggamehuntingblog.com and give it a peruse.
--------------------------------------------------------------------------------------------------------------------
Unfortunately, many hunters do the vast majority of their shooting from a bench rest, which is not the best practice for taking shots under typical hunting conditions. Now I don’t know about you, but I’ve never taken a shot at a deer, or any other big game species for that matter, from a bench rest. For this reason, it is important that hunters learn to shoot from positions they are more likely to use when hunting. This article describes my choices for the best hunting shooting positions and the advantages and disadvantages for each one.
There are four primary positions that most hunters and shooters use that I’ll discuss in this article. From least stable to most stable these positions are: standing, kneeling, sitting, and prone. All of these positions may be used both with and without additional external support, such as shooting sticks or a sling.
The descriptions of each position in this article are those that I’ve found are best suited for hunting and will not necessarily be the best choices for shooting in a competition. Additionally, the exact details of each position listed here are the ones that work best for me, which may not be the best for you. Luckily, there are several variations of each position that you may use in accordance with your equipment, flexibility, and the exact situation that you may find yourself in. Finally, keep in mind that I am left handed, so all of the photographs of me demonstrating these positions will need to be reversed for a right handed shooter.
STANDING SHOOTING POSITION
The standing shooting position is the fastest shooting position to assume. The standing position also typically gives the hunter the best field of view, allowing him or her to see over all but the tallest grass and brush. Unfortunately, the standing position is also the least stable shooting position.
However, this is not really a problem when shooting at very close range ( During all of my years of hunting, I’ve only taken a handful of completely unsupported standing shots while hunting. However, every single one of them was at an animal that I encountered at very close range (5-20 yards) in very thick cover. In these situations, my ability to take a rapid shot was more important than assuming a more stable shooting position.
When possible, I use a supported shooting position. Support can come from a variety of sources: shooting sticks (which make great gifts for hunters by the way), a tree, etc. Of these, a tree is my favorite choice because I don’t have to carry it with me and there is almost always one within easy reach when walking through the woods.
Support can encompass a wide range of objects such as a backpack, a log, or a bi-pod. Of these, your backpack is an especially good choice. Think about it: you’re probably carrying some sort of pack with you on most hunts that contains stuff like some food, water, extra ammo, some basic gun cleaning supplies, a jacket, etc. Just slip if off your back and use it as a rest for your rifle. Depending on how tall the backpack is, you could potentially use it as a rest in the prone as well as the sitting and kneeling positions.
When using a “soft” form of support, such as a backpack, place the forend of the rifle directly on it. When shooting across something harder, like a log or a rock, it may help to place some form of padding between the rifle and the object, such as a rolled up jacket or even something like your gun cleaning mat. Do not let anything directly touch the barrel, as this will adversely affect your accuracy.

Be careful not to let anything touch the rifle barrel.
KNEELING SHOOTING POSITION
The kneeling shooting position is the second fastest shooting position to assume, and when done correctly, provides a fairly stable shooting position. Unfortunately, only one elbow is supported when using the kneeling position, which is obviously not ideal. The kneeling position also gives the hunter the ability to see over brush, grass, and other things obscuring the target, though not as much as when standing. At the same time, the kneeling position also presents a smaller, more difficult to spot profile.
The kneeling position is a very good position to use when the hunter doesn’t have much time to take a shot, or needs to shoot over brush or grass obscuring the target, thus making the prone or sitting positions unsuitable, but the target is too far away to take an ethical shot while standing.
To assume a kneeling position, place your dominant side knee on the ground at an approximately 90 degree angle from your non-dominant knee. If you can, turn your dominant side foot so that as much of it as possible contacts the ground, then sit on your foot. This will provide a more stable position than sitting on your heel. However, not everyone is flexible enough to do this, so do what works best for you.
Rest your support side arm on the front of your non-dominant knee using the flat, meaty part of your arm just above your elbow. Do not rest the “point” of your elbow on your kneecap, as this will provide a very unstable platform. Though not demonstrated here, the kneeling shooting position may also be used in conjunction with other forms of support such as shooting sticks or a sling to make it more stable. When ample time and resources are available, it is always a good idea to use additional measures to assist you in making your position more stable.
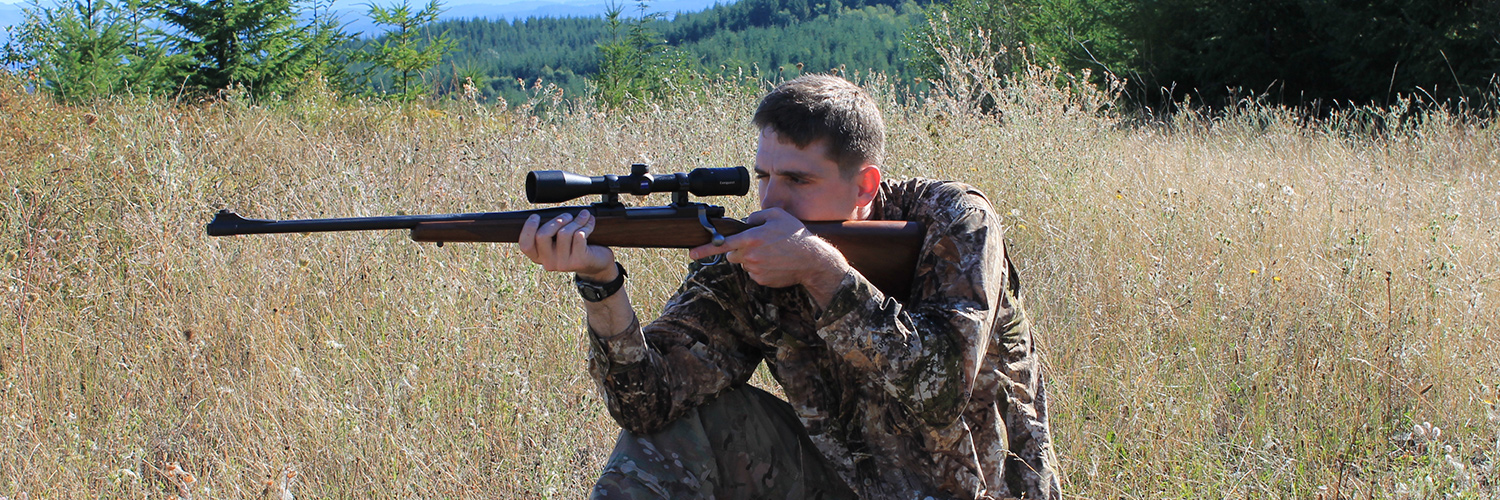
See how my left elbow is unsupported?
SITTING SHOOTING POSITION
The sitting position takes a little more time to achieve than the kneeling position, but is very stable. Though the hunter’s line of sight is usually slightly lower when compared to the kneeling position, it is still typically high enough to see over most objects obscuring the target. This is usually the best shooting position to assume when the hunter has ample time to prepare for the shot, but the circumstances are not suitable for using the prone shooting position. The big advantage that sitting has over kneeling is that both elbows are supported instead of just one when kneeling.
There are several variants of the sitting position, but here I’ll discuss probably the most common: cross legged. To assume a sitting shooting position, sit down cross legged and pull both legs as close to the body as you can. The idea is to get as close to the ground as possible. Push your knees down as far as you can, lean forward, and rest the flat, meaty portion of both of your arms just above your elbows in front of your knees. Just like when shooting from the kneeling position, do not rest the “point” of your elbow on top of your knee.
The sitting position is usually uncomfortable the first few times you try it. However, the more you practice, the more comfortable it will become. When used properly, the sitting position can be nearly as stable as the prone position and experienced shooters can shoot accurately at long range using this position. Additionally, like the kneeling position, the sitting shooting position may also be used in conjunction with a sling, shooting sticks, a bi-pod, or some other form of support to make it even more stable.

The sitting position provides support for both elbows.
PRONE SHOOTING POSITION
The prone position is the slowest position to achieve, but it is the most stable. Since the hunter is so close to the ground when prone, this makes it easier to hide from game without being spotted. However, this also makes it difficult for the hunter to see the target if there is any grass or brush in the way. Because of these disadvantages, the prone position is only the best choice when there is plenty of time to prepare for the shot and when there are no objects in the way to obscure the target.
To get into the prone shooting position, assume the push-up position behind your rifle. Then, lower your body to the ground straight behind your rifle with your non-dominant hand supporting the forend of the rifle, as close as possible to being directly below it. Next, spread your legs and point your toes outward with your ankles flat on the ground. Not everyone will be able to do this, but the idea is to get as much of your body as possible in contact with the ground. Then, pull the butt of the rifle firmly into the pocket of your shoulder with your dominant hand. Though it is possible to shoot from the prone position in both a supported and unsupported manner, if you have enough time to get into a good prone shooting position, then you likely have enough time to use some form of support. Doing so will dramatically increase your stability and make shooting at long distance much easier. Support can encompass a wide range of objects such as a backpack, a log, or a bi-pod.
When using a “soft” form of support, such as a backpack, place the forend of the rifle directly on it. When shooting across something harder, like a log or a rock, it may help to place some form of padding between the rifle and the object, such as a rolled up jacket. Do not let anything directly touch the barrel, as this will adversely affect your accuracy.
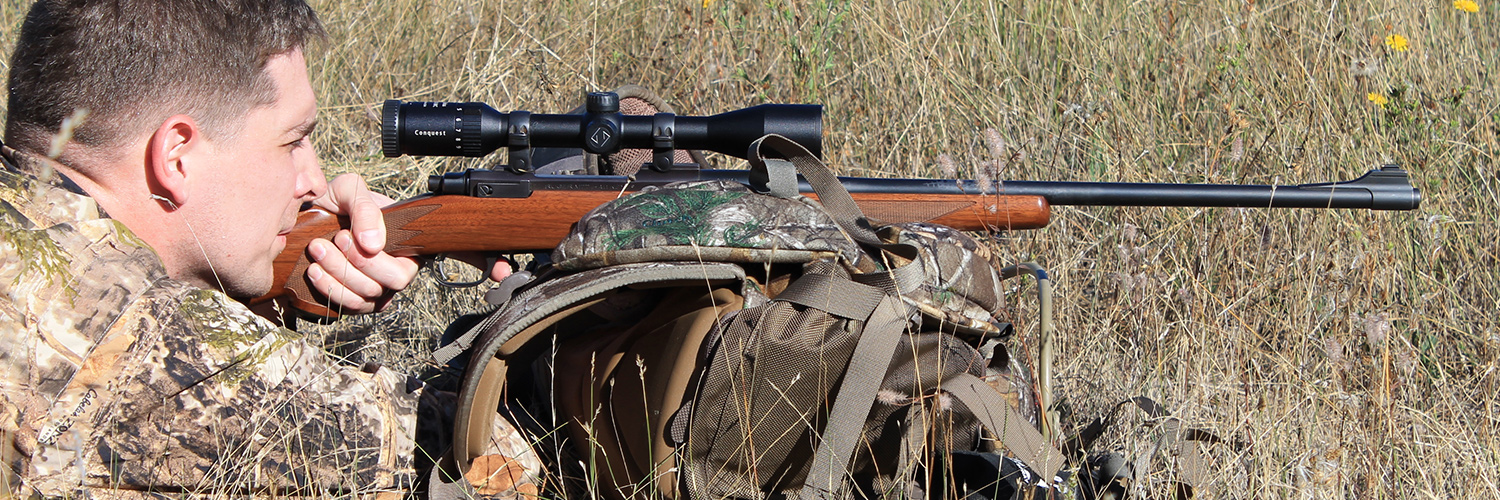
Note how high the grass is compared to my line of sight.
Additionally, it is always a good idea to use some form of support beneath the rear of the rifle’s stock if possible. You can purchase a purpose built mono-pod or shooting bag for this purpose, or you can just use an old sock filled with sand or beads. Using your support hand, place the bag beneath the rear sling swivel and increase or decrease pressure on it to depress or elevate your muzzle. Using a rear bag makes the prone shooting position even more stable and a good shooter is capable of excellent accuracy when using one.

Note the black and green sock beneath the butt of the rifle.
Keep in mind that, while various shooting positions are favored in different parts of the world (like shooting from the prone on a red stag hunting trip in New Zealand or standing from shooting sticks when pursuing cape buffalo on an Africa hunting safari) there is no single “best” shooting position for all hunting situations. Each position has strengths and weaknesses and it is up to the hunter to choose the position that allows him or her to take the most accurate and ethical shot.

Going There to Learn to Get Out of Here
Solo mission. Well, almost solo. Solo with the exception of two ptarmagin hungry dogs. These guys refuse to let me go alone and I wouldn’t have it any other way.
But the business was serious. Clearing the head, scouting for deer/elk/bear and whatever else nature had to offer us. She never seems to disappoint. At approximately 6:15am we were bombarded by a squadron ptarmagin that seemed to care less about two salivating hunting dogs just beginning me to release them for the retrieve. I’m pretty sure I saw a Department of Wildlife brochure under one such bird’s wing. They know the season and I can guarantee when I’m back up here in a month, they won’t be.
So we sat. And sat some more. I’m a starting to come to terms with what big game hunting really is. Break your back and burn your legs until you can see the fat sizzling, then sit on your ass for a few days while drinking enough coffee to give a horse a heart attack. Attempting to stave off sleep by alternating between glassing and reading “Think and Grow Rich”, by Napoleon Hill, wasn’t helping my situation.
